
An official website of the United States government

Here’s how you know

Official websites use .gov
A .gov website belongs to an official government organization in the United States.

Secure .gov websites use HTTPS
A lock ( ) or https:// means you’ve safely connected to the .gov website. Share sensitive information only on official, secure websites.

GSA Logo U.S. General Services Administration
    • Explore buy through us
    • Category management
    • Government property for sale or lease
      Toggle submenu
      • Personal property (tangible goods)
      • Real property (real estate and buildings) for public use
      • Real property sales
      • Vehicle sales
    • Products and services
      Toggle submenu
      • Human capital
      • Industrial products and services
      • Office management
      • Professional services
      • Security and protection
      • Transportation and logistics services
    • Purchasing programs
      Toggle submenu
      • Assisted acquisition
      • Commercial platforms
      • Federal strategic sourcing initiative
      • Fleet management
      • HCaTS and HCaTS SB
      • OASIS and OASIS SB
      • Requisition programs
      • State and local programs
      • Emergency acquisition basic ordering agreements
    • Shared services
      Toggle submenu
      • Payroll services
      • Support services for CABs

    Featured Topics

    • Multiple Award Schedule Governmentwide contracts for products and services at volume discount pricing.
    • Auctions Federal assets available via auction to the general public.
    • Explore sell to government
    • Step 1: Learn about government contracting
      Toggle submenu
      • Ways you can sell to government
      • How to access contract opportunities
      • Conduct market research
    • Step 2: Compete for a contract
      Toggle submenu
      • Register your business
      • Certify as a small business
      • Become a schedule holder
      • Market your business
      • Research active solicitations
      • Respond to a solicitation
      • What to expect during the award process
    • Step 3: Manage your contract
      Toggle submenu
      • Comply with contractual requirements
      • Handle contract modifications
      • Monitor past performance evaluations

    Featured Topics

    • Contract opportunities on SAM.gov Search current federal contract opportunities and procurement notices.
    • Forecast of contracting opportunities Anticipated contracts offered by GSA.
    • Vendor support center Research the federal market, report sales, and upload contract information.
    • Explore real estate
    • Design and construction
      Toggle submenu
      • 3D-4D building information modeling
      • Computer-aided design standards
      • Engineering
      • Project management information system
      • Prospectus thresholds
    • Facilities management
      Toggle submenu
      • Security
      • Tenant services
      • Water quality management
    • Our properties
      Toggle submenu
      • Owned and leased properties
      • Renting property
    • Real estate services
      Toggle submenu
      • Leasing resources
      • Real property disposal
      • Reimbursable services (RWA)
      • For businesses seeking opportunities
      • For workers in federal buildings
      • Voice of the customer
    • Workplace optimization
      Toggle submenu
      • Commercial coworking
      • Space Match
    • Explore historic buildings

    Featured Topics - Real Estate

    • Historic preservation tools and resources Procedures for maintaining and repairing historic buildings.
    • Real property disposal Dispose or acquire excess federal real property including buildings or land.
    • Explore policy and regulations
    • Acquisition policy
    • Aviation management policy
    • Federal Advisory Committee Act management
    • Information technology policy
    • Real property management policy
    • Travel management policy
    • Regulations
      Toggle submenu
      • Federal acquisition regulations
      • Federal management regulations
      • Federal travel regulations

    Featured Topics

    • Forms Search for a government form.
    • Per diem FAQs Frequently asked questions about per diem rates and related topics.
    • Explore small business
    • Small business goals
    • Register your business
      Toggle submenu
      • Explore business models
      • Research the federal market
      • Subcontracting and other partnerships
    • Forecast of contracting opportunities
    • Small business resources
      Toggle submenu
      • Small business contacts
      • Videos

    Featured Topics

    • Forecast tool Information on planned federal contracting opportunities.
    • Socio economic categories Check your eligibility for small-business set-asides.
    • Training resources Suggested training for doing business with us.
    • Explore travel
    • Plan a trip
      Toggle submenu
      • Per diem rates
      • Transportation (airfare rates, POV rates, etc.)
      • Lodging
      • Travel charge card
    • Travel and lodging services
      Toggle submenu
      • E-gov travel service (ETS)
      • Rideshare
      • Travel category schedule
    • Federal travel regulation

    Featured Topics

    • Per diem rates look-up Allowances for lodging, meal and incidental costs while on official government travel.
    • Mileage reimbursement rates Reimbursement rates for the use of your own vehicle while on official government travel.
    • Explore technology
    • Purchasing programs
      Toggle submenu
      • Cloud computing services
      • Cybersecurity products and services
      • Governmentwide acquisition contracts
      • MAS information technology
      • USAccess
    • Government initiatives
      Toggle submenu
      • Artificial Intelligence
      • Cybersecurity
      • Emerging citizen technology
      • FedRAMP
      • Federal identity, credentials, and access management
      • Robotic process automation community
      • Technology modernization fund
    • Training

    Featured Topics

    • Challenge.gov Government sponsored challenges and prize competitions.
    • Data.gov Access U.S. government data.
    • Multiple award schedule IT category Information technology products, services and solutions.
    • Explore about us
    • Background and history
      Toggle submenu
      • Overview
      • Mission and strategic goals
      • Role in presidential transitions
    • Careers
      Toggle submenu
      • Get an internship
      • Launch your career
      • Elevate your professional career
      • Discover special hiring paths
      • Resources and related links
    • Events and training
      Toggle submenu
      • Events, training, and request a speaker
      • Our training programs
    • Newsroom
      Toggle submenu
      • Agency blog
      • Congressional testimony
      • GSA does that podcast
      • News releases
      • Speeches
      • Videos
    • Organization
      Toggle submenu
      • Leadership directory
      • Federal Acquisition Service
      • Public Buildings Service
      • Staff offices
    • Contact us

    Featured Topics

    • Blog Read the latest GSA news, updates and analysis.
    • Careers Learn what we have to offer.
  • Per diem lookup
Buy through us
Explore buy through us
Category management
Government property for sale or lease
Personal property (tangible goods)
Real property (real estate and buildings) for public use
Real property sales
Vehicle sales
Products and services
Human capital
Industrial products and services
Office management
Professional services
Security and protection
Transportation and logistics services
Purchasing programs
Assisted acquisition
Commercial platforms
Federal strategic sourcing initiative
Fleet management
HCaTS and HCaTS SB
OASIS and OASIS SB
Requisition programs
State and local programs
Emergency acquisition basic ordering agreements
Shared services
Payroll services
Support services for CABs
Sell to government
Explore sell to government
Step 1: Learn about government contracting
Ways you can sell to government
How to access contract opportunities
Conduct market research
Step 2: Compete for a contract
Register your business
Certify as a small business
Become a schedule holder
Market your business
Research active solicitations
Respond to a solicitation
What to expect during the award process
Step 3: Manage your contract
Comply with contractual requirements
Handle contract modifications
Monitor past performance evaluations
Real estate
Explore real estate
Design and construction
3D-4D building information modeling
Computer-aided design standards
Engineering
Project management information system
Prospectus thresholds
Facilities management
Security
Tenant services
Water quality management
Our properties
Owned and leased properties
Renting property
Real estate services
Leasing resources
Real property disposal
Reimbursable services (RWA)
For businesses seeking opportunities
For workers in federal buildings
Voice of the customer
Workplace optimization
Commercial coworking
Space Match
Explore historic buildings
Policy and regulations
Explore policy and regulations
Acquisition policy
Aviation management policy
Federal Advisory Committee Act management
Information technology policy
Real property management policy
Travel management policy
Regulations
Federal acquisition regulations
Federal management regulations
Federal travel regulations
Small business
Explore small business
Small business goals
Register your business
Explore business models
Research the federal market
Subcontracting and other partnerships
Forecast of contracting opportunities
Small business resources
Small business contacts
Videos
Travel
Explore travel
Plan a trip
Per diem rates
Transportation (airfare rates, POV rates, etc.)
Lodging
Travel charge card
Travel and lodging services
E-gov travel service (ETS)
Rideshare
Travel category schedule
Federal travel regulation
Technology
Explore technology
Purchasing programs
Cloud computing services
Cybersecurity products and services
Governmentwide acquisition contracts
MAS information technology
USAccess
Government initiatives
Artificial Intelligence
Cybersecurity
Emerging citizen technology
FedRAMP
Federal identity, credentials, and access management
Robotic process automation community
Technology modernization fund
Training
About us
Explore about us
Background and history
Overview
Mission and strategic goals
Role in presidential transitions
Careers
Get an internship
Launch your career
Elevate your professional career
Discover special hiring paths
Resources and related links
Events and training
Events, training, and request a speaker
Our training programs
Newsroom
Agency blog
Congressional testimony
GSA does that podcast
News releases
Speeches
Videos
Organization
Leadership directory
Federal Acquisition Service
Public Buildings Service
Staff offices
Contact us
  1. Home
  2. Buy through us
  3. Shared Services
  4. Support Services for Commissions and Boards
  5. HR Links user guides
  6. Time and leave
  7. Create a timesheet (supervisors)

Create a timesheet (supervisors)

Follow this job aid to learn how to create and approve a timesheet for an employee in HR Links.
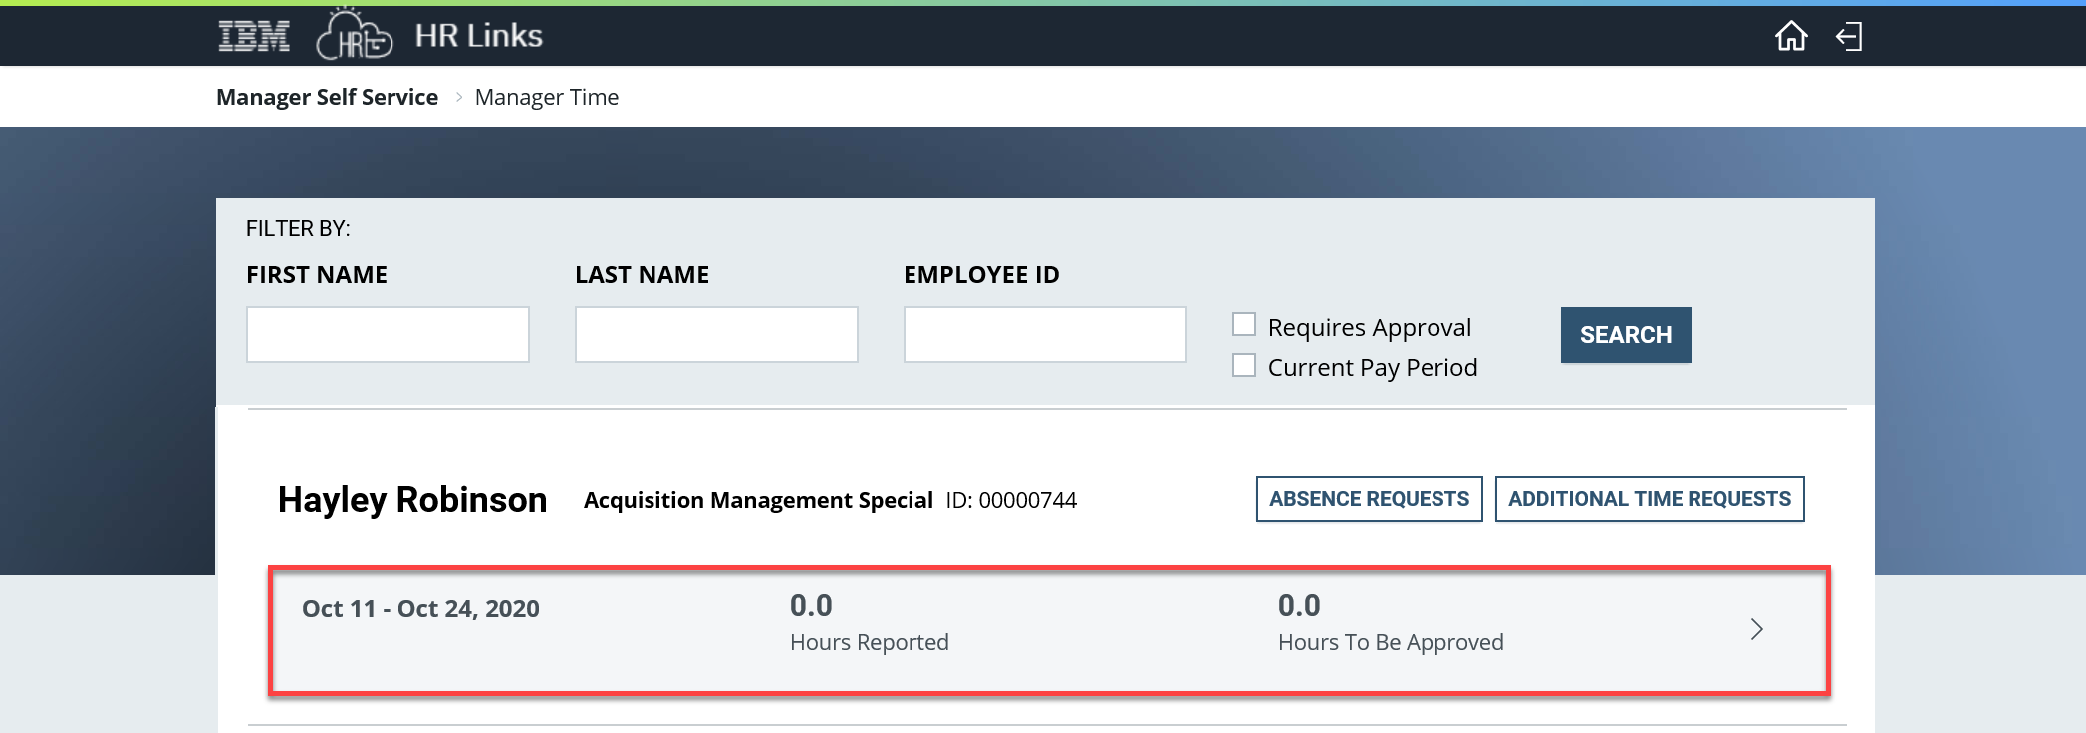
Employee timesheet created from the manager time tile

  1. Select the Manager Time tile on the Manager Self Service homepage.

    Screenshot of the Self Service home page
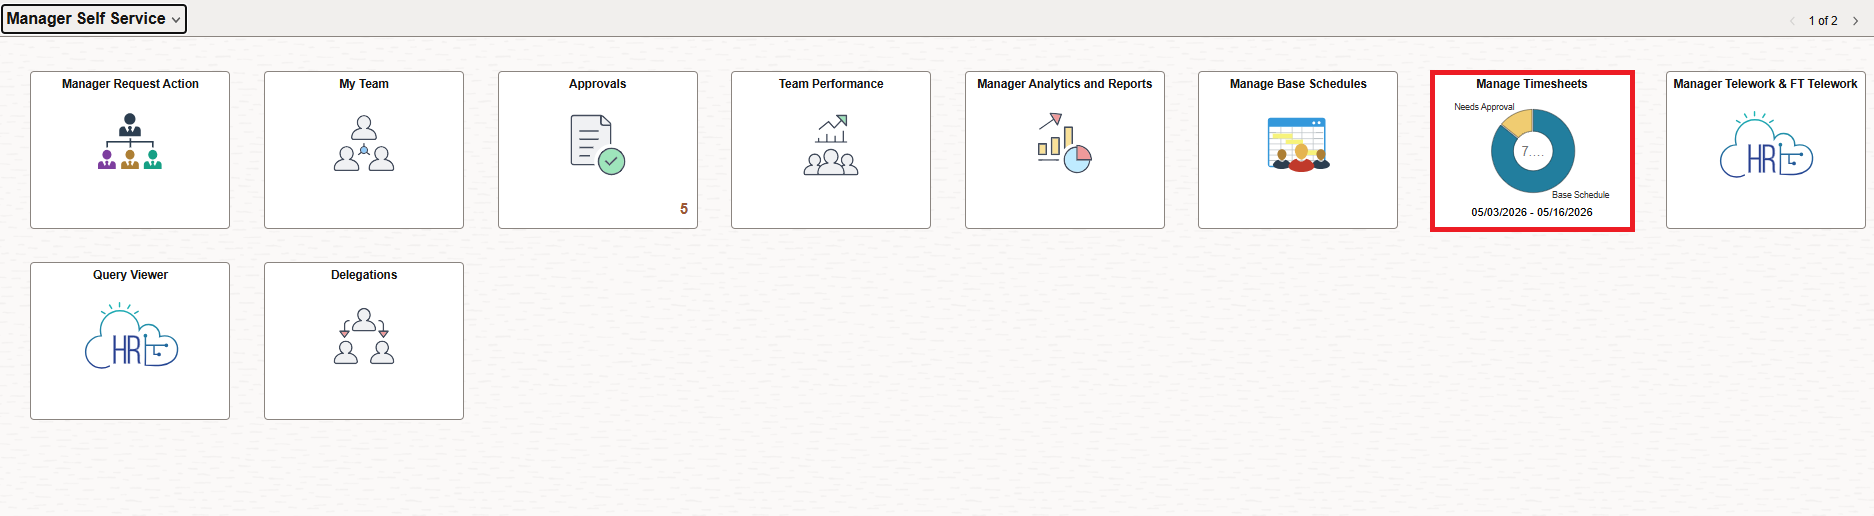
    Note: The status information on the tile may take a few seconds to appear.
  2. Select the Employee from the list (click in the pay period, hours reported, hours to be approved area).

    Screenshot of the Manager Time page with the employee time highlighted

    If you receive a pop-up message asking you to apply your base schedule, select Yes.

    Screenshot of the Manager Time popup with the Would you like to apply to your schedule? question with the Yes button highlighted
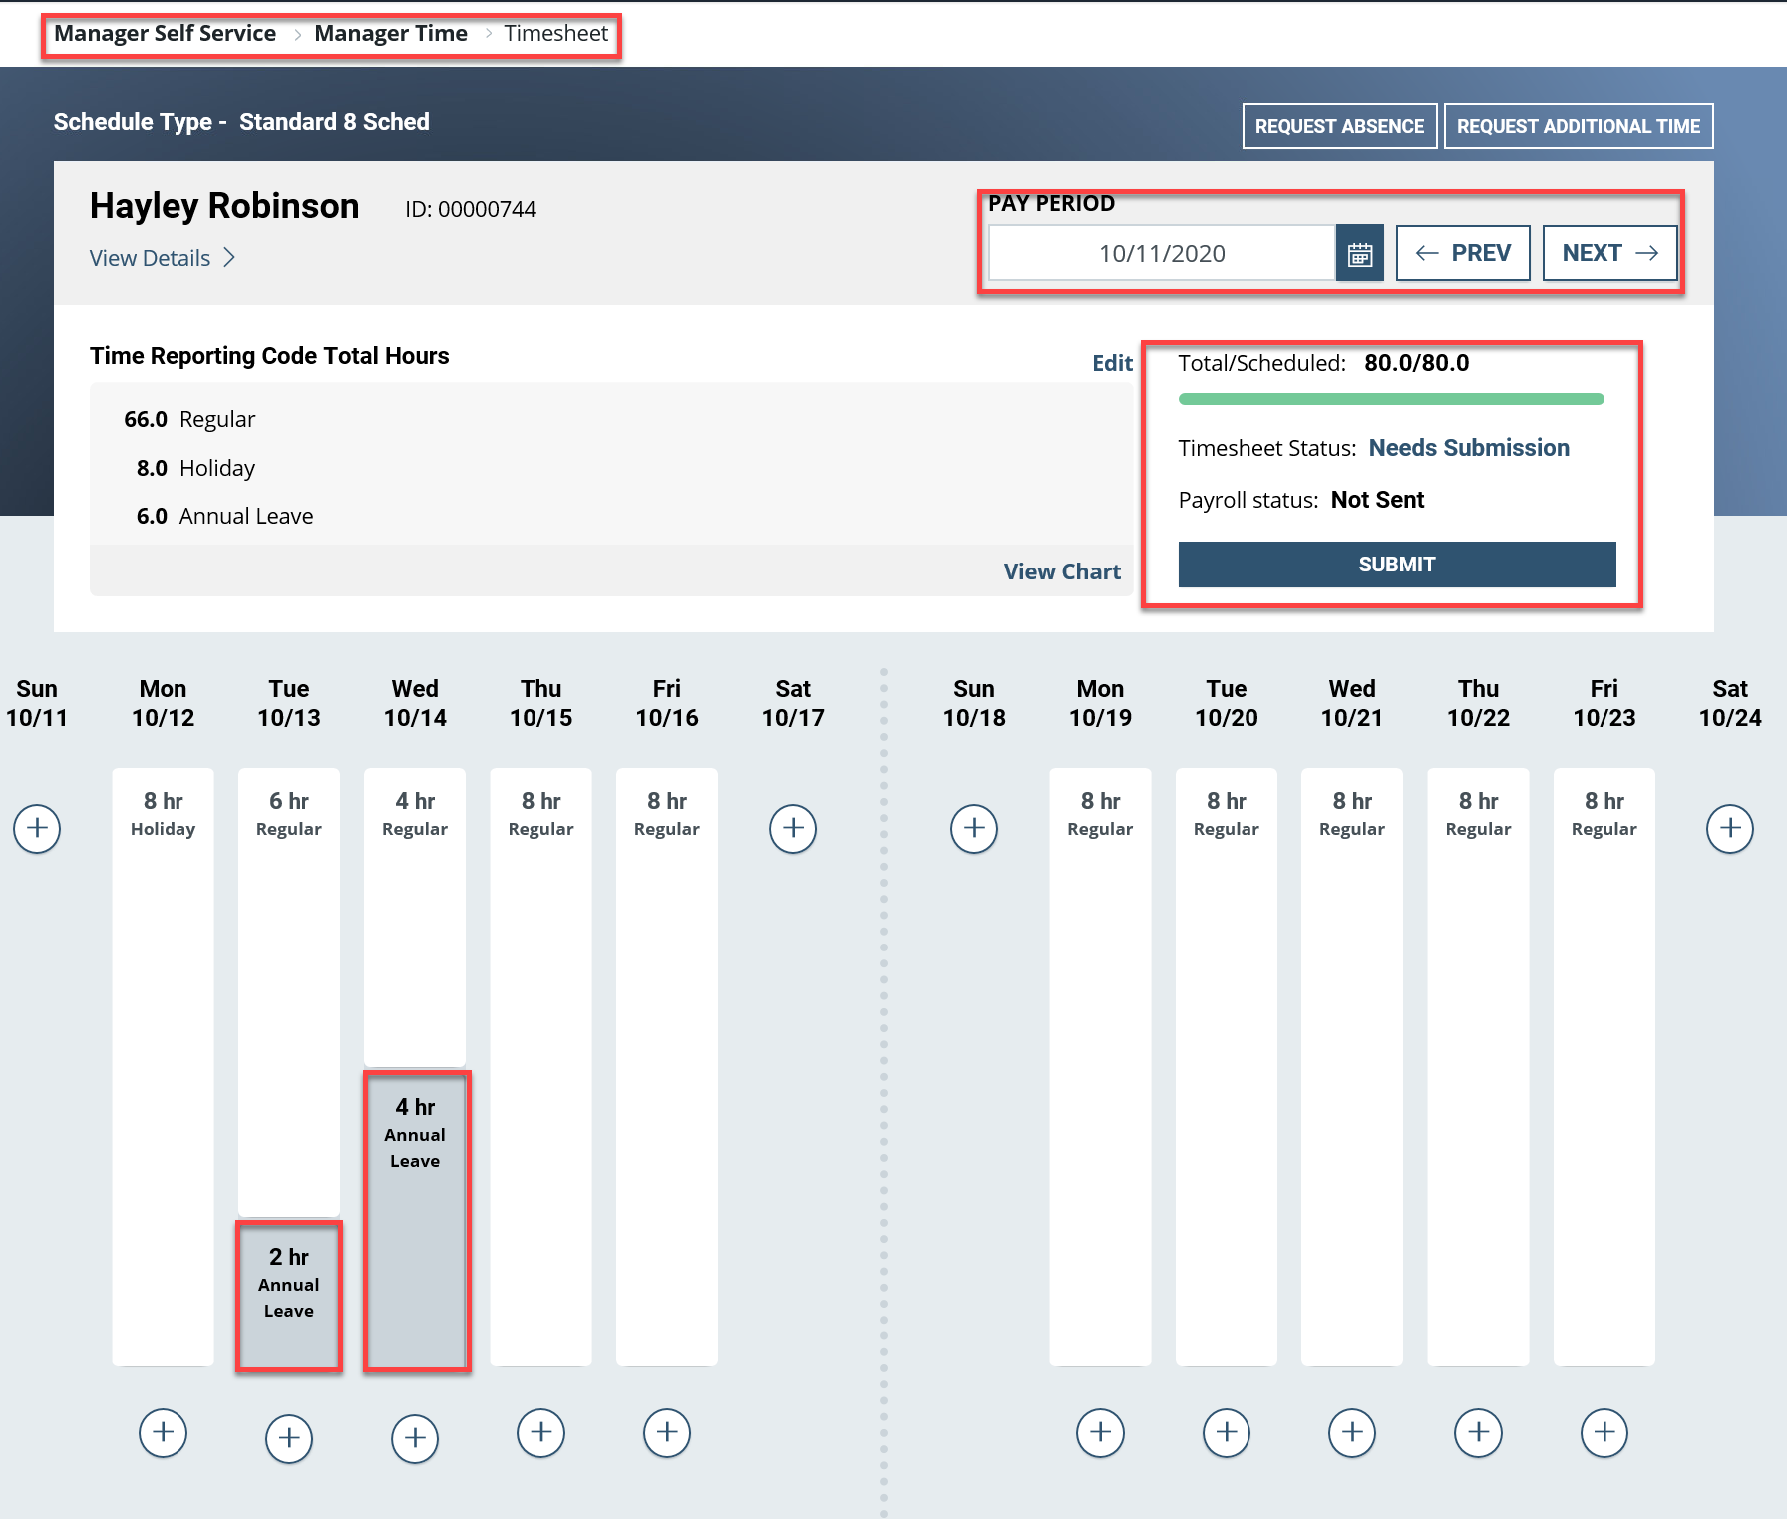
  3. The Time screen will appear, displaying the current pay period with the employee’s base schedule applied. Use the breadcrumbs in the upper left corner of the screen to navigate back to the Employee Self Service or home screen.

    You will now see an information panel at the top of the Timesheet screen:

    • the Pay Period field will show the first day of the current pay period
    • the Timesheet Status will initially read “No Timesheet”
    • and the Payroll Status will be “Not Sent”

    Any absence or overtime requests that have already been submitted and approved will also be reflected. The status will change to “Needs Submission” once you have begun making changes to the timesheet.

    Screenshot of the Manager Time page with pay period and edit areas highlighted
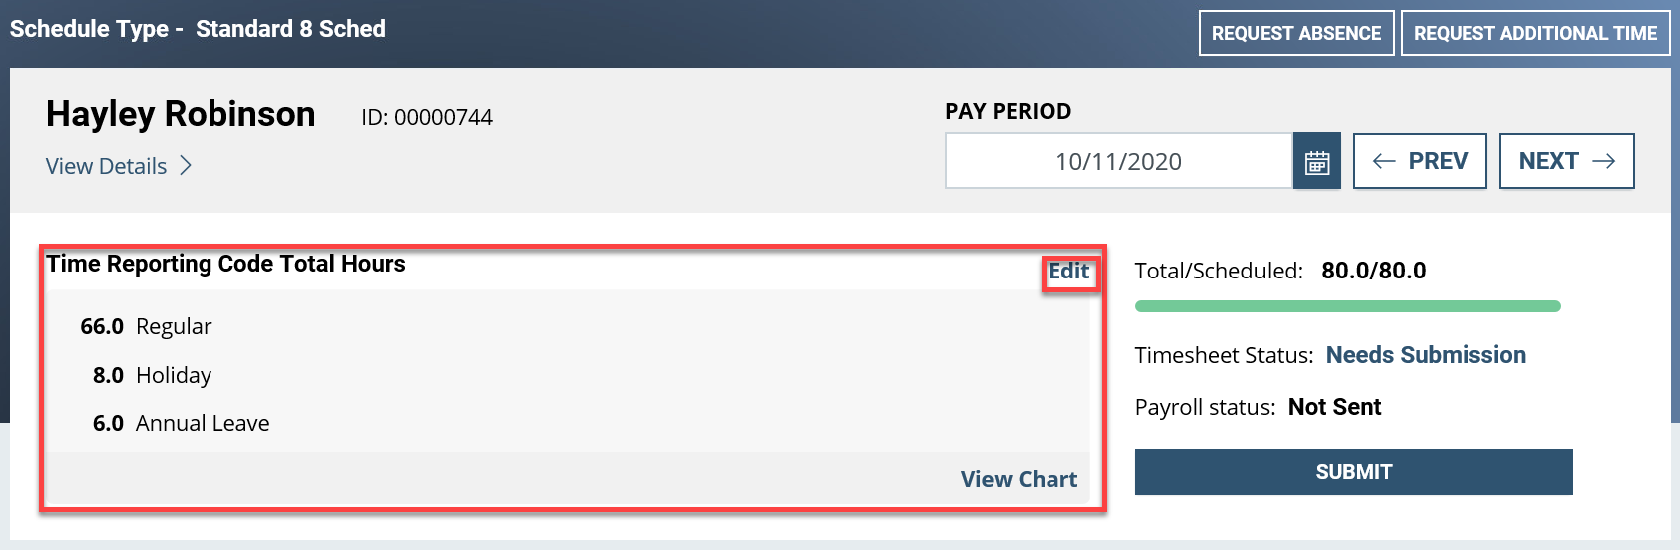
  4. Next, review the hours displayed on the timesheet and make any necessary changes or updates. The Time Reporting Code Total Hours table provides a breakdown of your timesheet hours by Time Reporting Code.

    There are two ways to make changes to the Time Reporting Code hours on your timesheet.

    The first approach, bulk edit, is to edit one or more of the Time Reporting Codes reflected in the Time Reporting Code Total Hours table without changing the overall hourly breakdown. To do this, click the Edit hyperlink in the upper right corner of the section.

    Screenshot of the Manager Time Schedule Type page with Time Reporting Code Total Hours highlighted
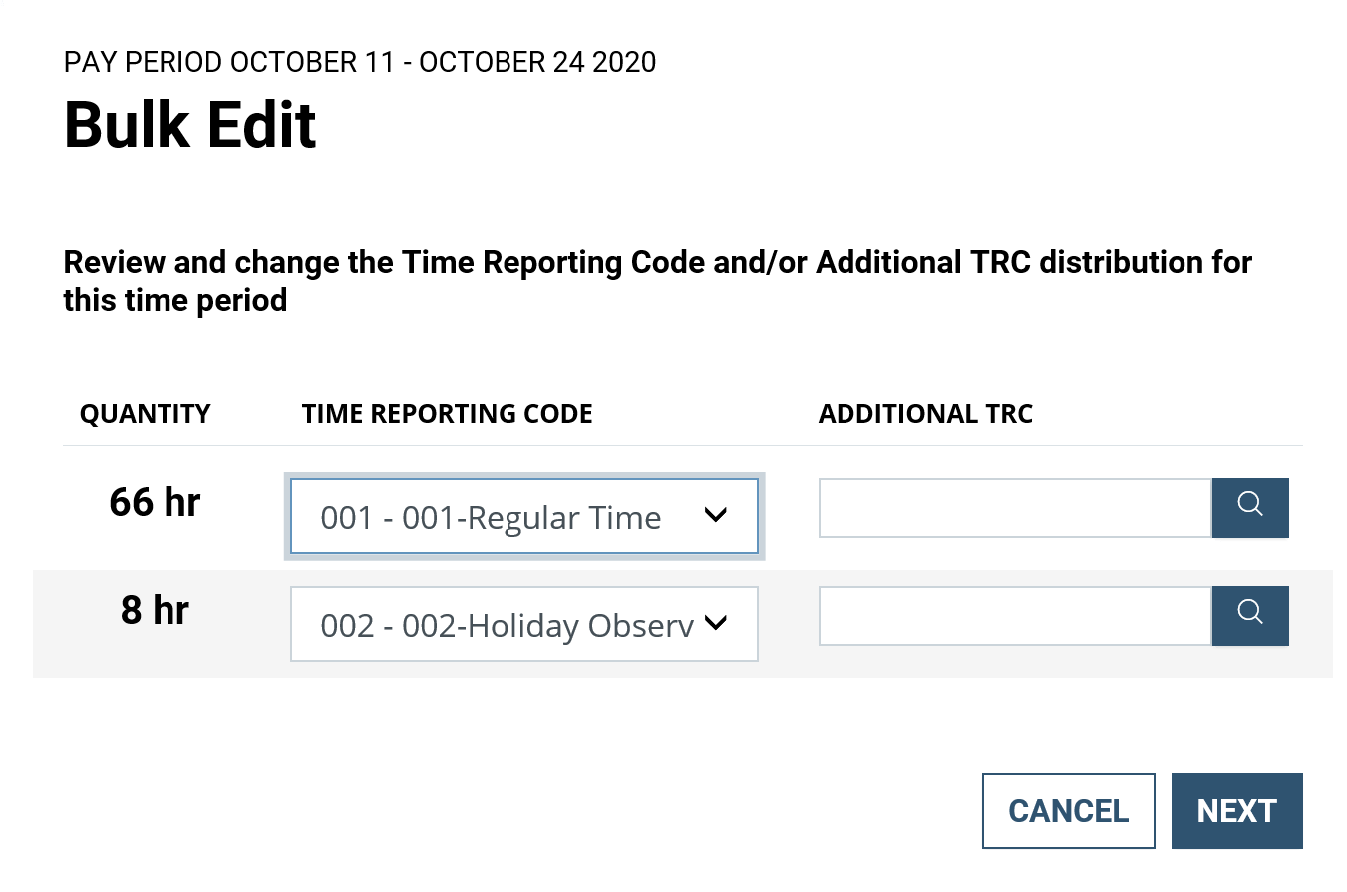
  5. In the Bulk Edit dialog box that appears, you can update any of the Time Reporting Codes on your timesheet by clicking the down arrow next to the code(s) you want to change and selecting a replacement from the dropdown menu. The most common use of Bulk Edit is to change Regular Time to a different telework code using the Additional TRC field.

    Screenshot of the Bulk Edit popup with Time Reporting Codes highlighted
  6. In this example, an Additional Time Reporting Code, 090-Telework - Emergency, will be added all Regular Time. (Note that you cannot change the Quantity of hours using this approach, only the TRC and Additional TRC codes.)

    Enter the numeric code or code description into the search field and select Next.

    Screenshot of the Bulk Edit popup with Additional Time Reporting Code highlighted
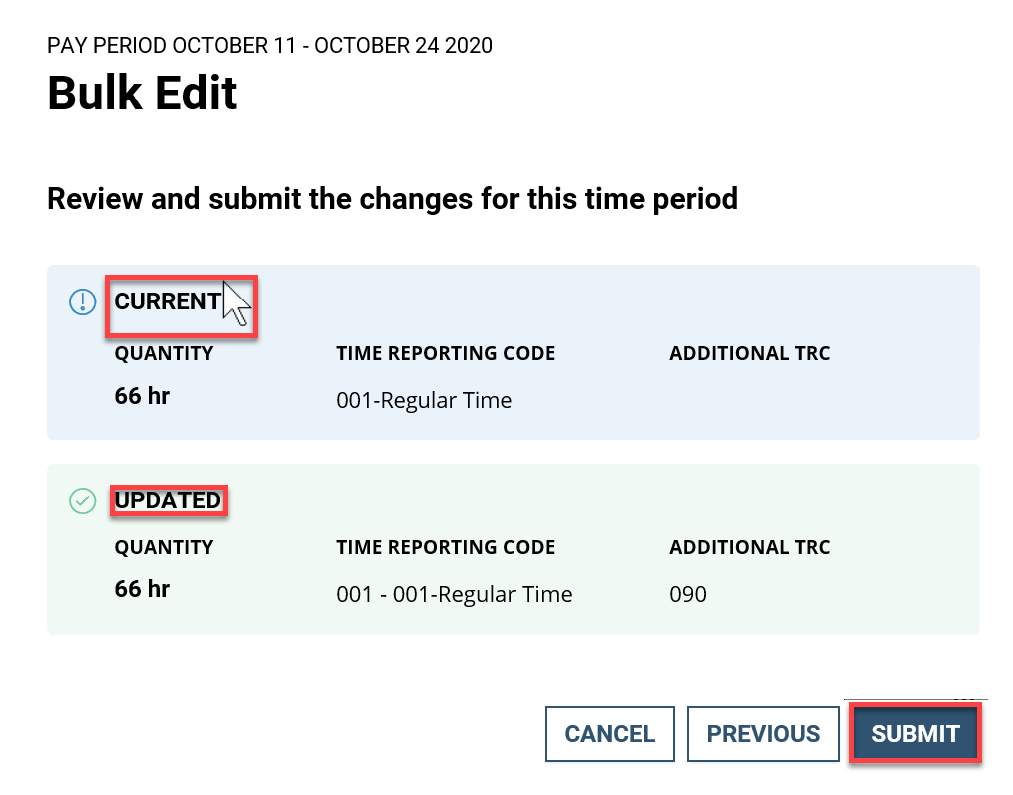
  7. A new dialog box will appear summarizing the change you are about to make; select Submit to complete the process.

    Screenshot of the Bulk Edit dialog box with Current, Updated and Submit highlighted
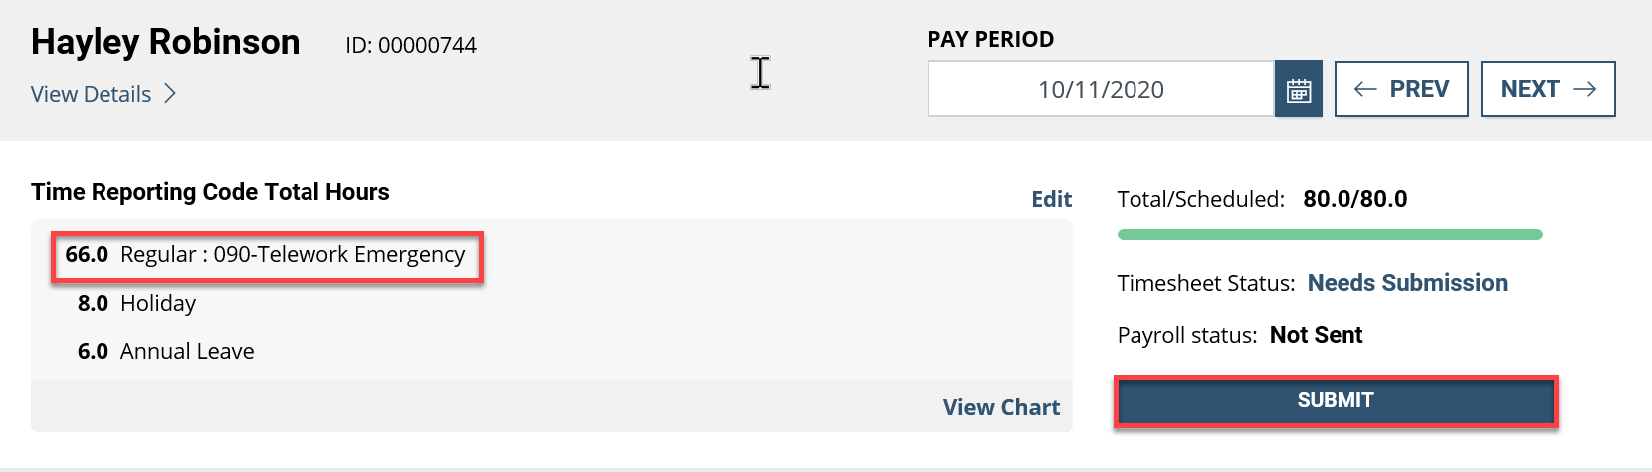
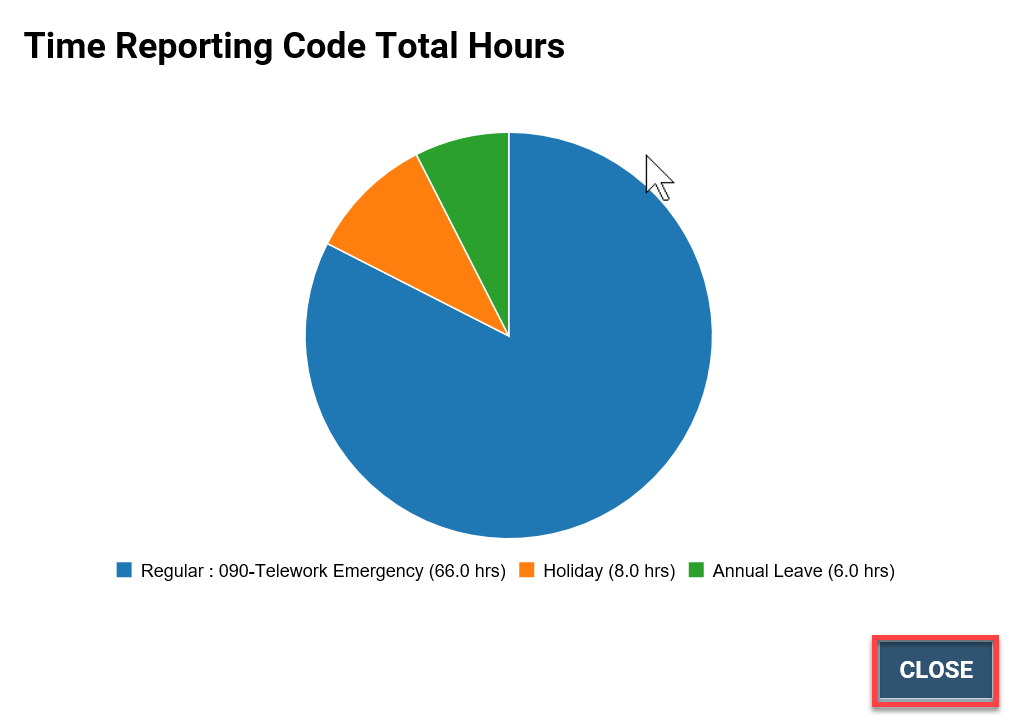
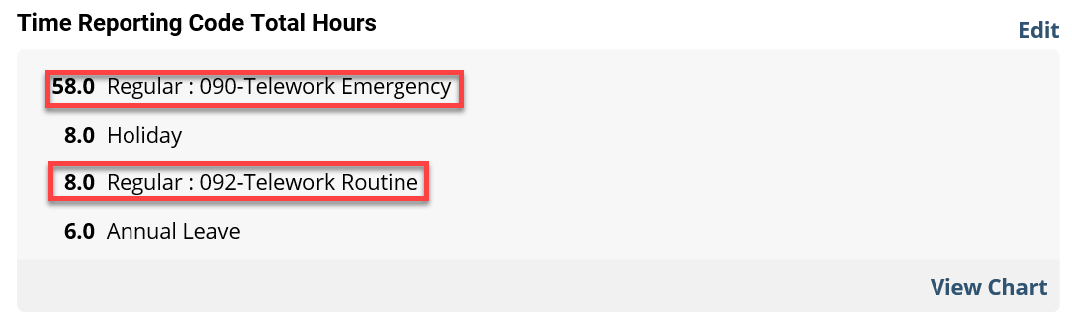
  8. The code you added now appears in the Time Reporting Code Total Hours section of your timesheet. If desired, select the View Chart button in the lower right-hand corner to access a pie chart showing the Time Reporting Code breakdown for the current pay period.

    Screenshot of the employee dialog box with regular hours highlighted
  9. Select the Close button to return to the timesheet screen.

    Screenshot of the timesheet screen with close button highlighted
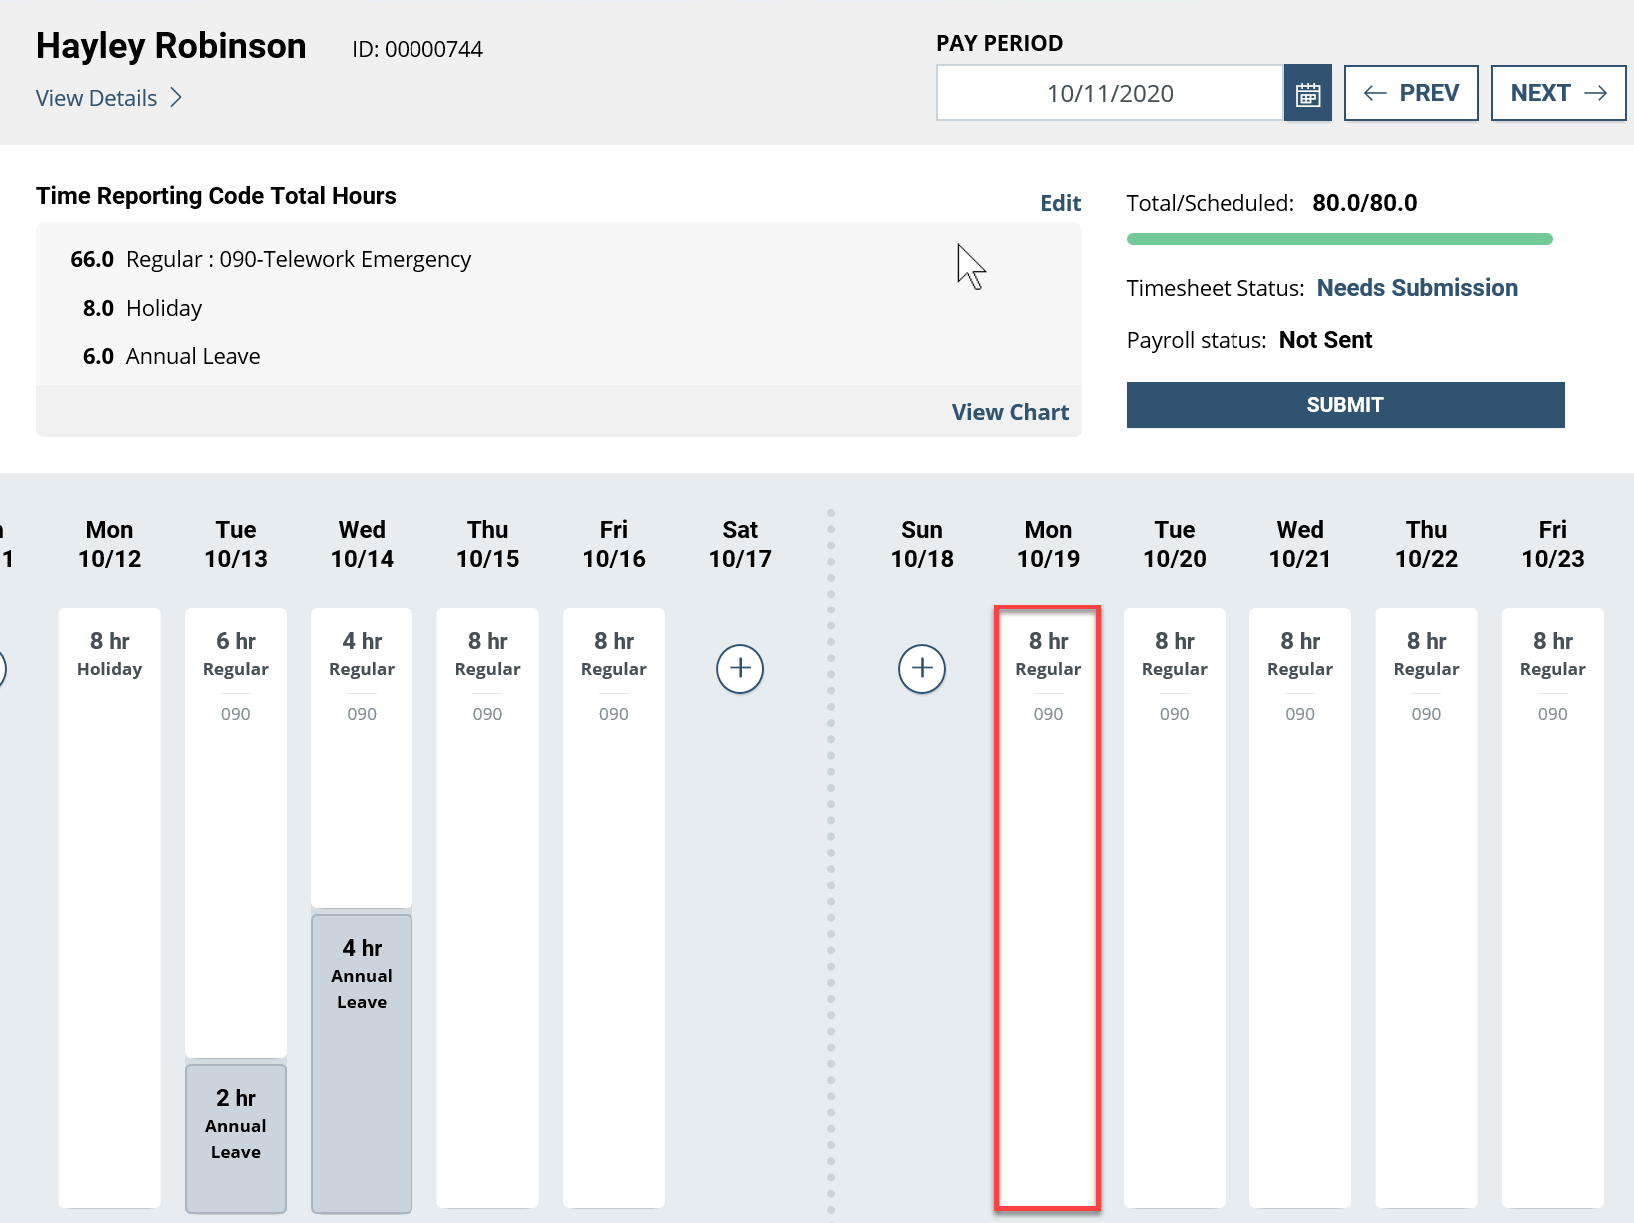
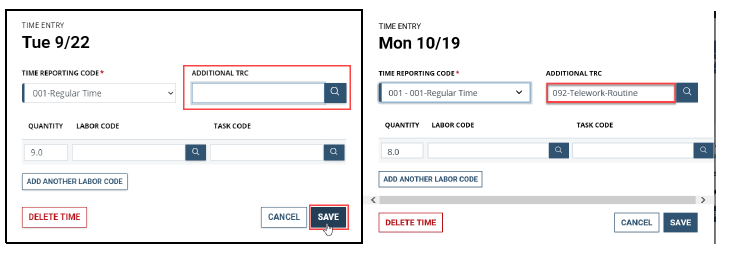
  10. To change the Time Reporting Code/s for a specific day, select the time block for the day you would like to update in the reported hours section of the timesheet. This will enable you to edit both the TRC codes and corresponding hours for the selected day.

    Screenshot of the employee screen with Monday highlighted
  11. In the Time Entry dialog box that appears, use the down arrow to access available Time Reporting Codes.

    Screenshot of the Time Entry screen with Additional time reporting code dropdown highlighted
  12. In this example, code 092 - Telework Routine will be added from the Additional TRC (Additional Time Reporting Code). Select Save to complete the change.

  13. The Additional Time Reporting Code 092-Telework Routine has been added to the time block. The Time Reporting Code Total Hours breakdown now reflects the change.

    Screenshot of the Time Reporting Code screen with regular hours highlighted
  14. If you will not be submitting any additional absence requests for this pay period and the total number of hours you reported equals the total number of hours in your base schedule (as indicated by the green bar under Total/Scheduled hours below), you can skip to step 23.

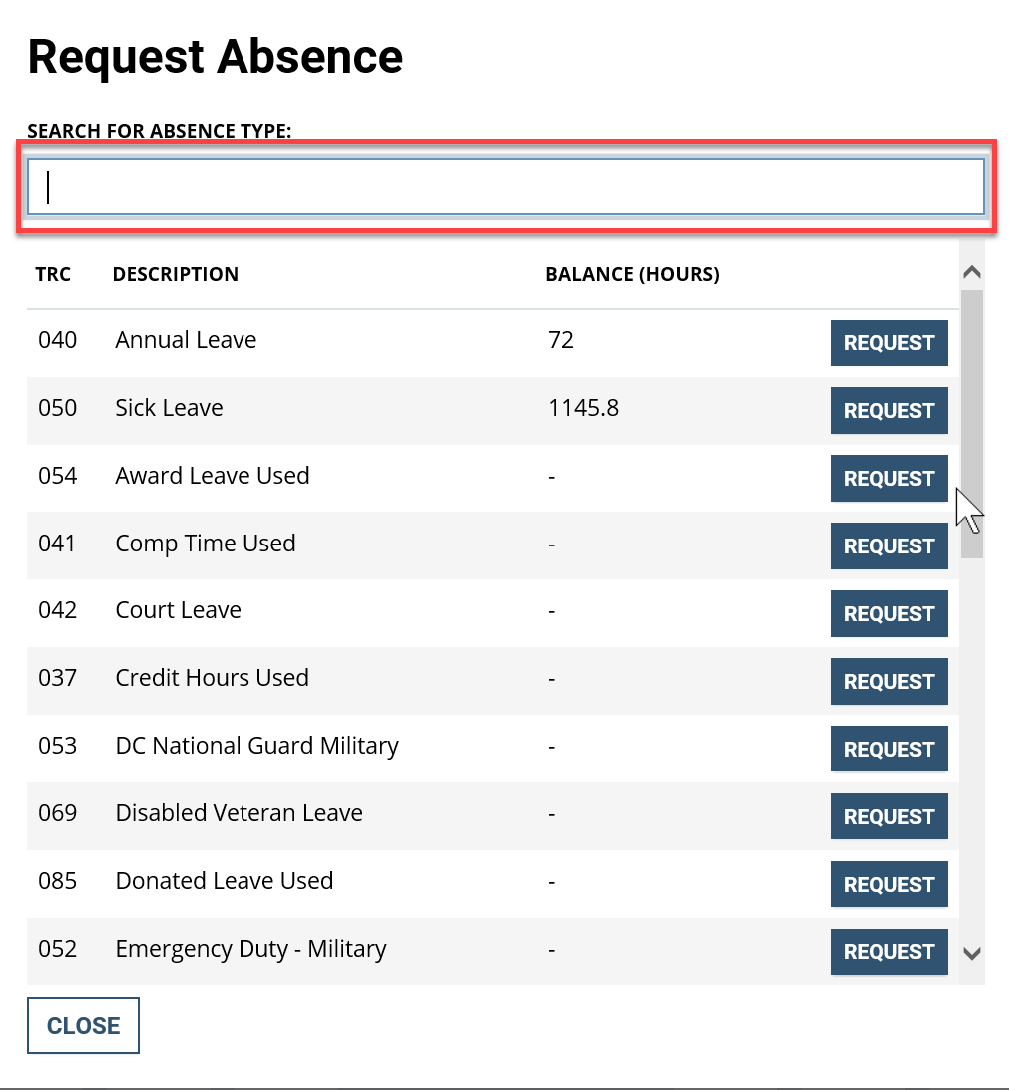
  15. If you will be submitting an Absence request from the timesheet, select the Request Absence button in the upper right-hand corner of the screen.

    Screenshot of the Employee screen with requested Absence highlighted
  16. In the dialog box that appears, find the Absence Type you want to request by typing all or part of the description into the Search for Absence Type field or by using the scroll bar on the right to find and select it. Then select the Request button next to your choice.

    Screenshot of the Request Absence screen with search field highlighted
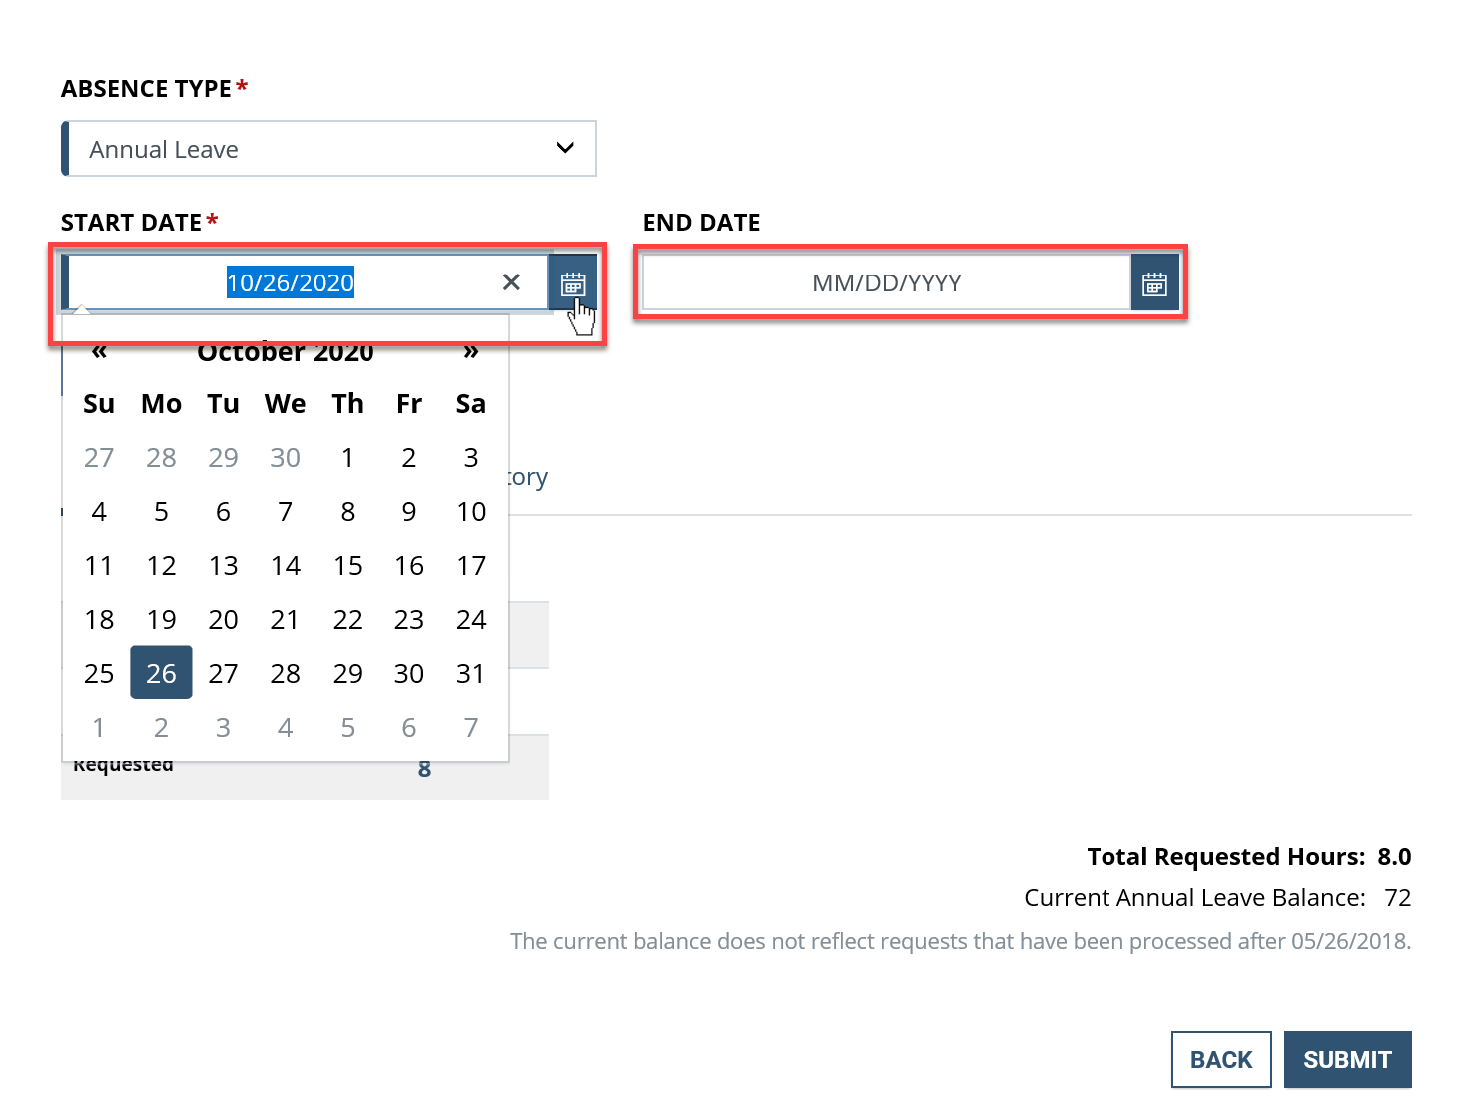
  17. A new dialog box will appear displaying the Absence Type you selected. Use the calendar icons to enter the Start and End Dates for the absence you are requesting.

    Screenshot of the Absence Type dialog box with Start and End Dates highlighted
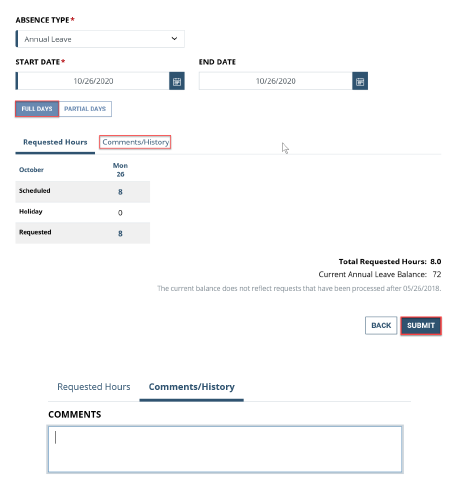
  18. After choosing the Start and End dates, the absence page defaults to Full Days.

    1. If you are requesting Full Days of absence, the page will automatically calculate the Total Requested Hours. You can select the Comments/History hyperlink and type comments into the text box that appears, as shown in the second box below. Once completed, select Submit.

      Screenshot of the Absence Type dialog box with Comments/History highlighted
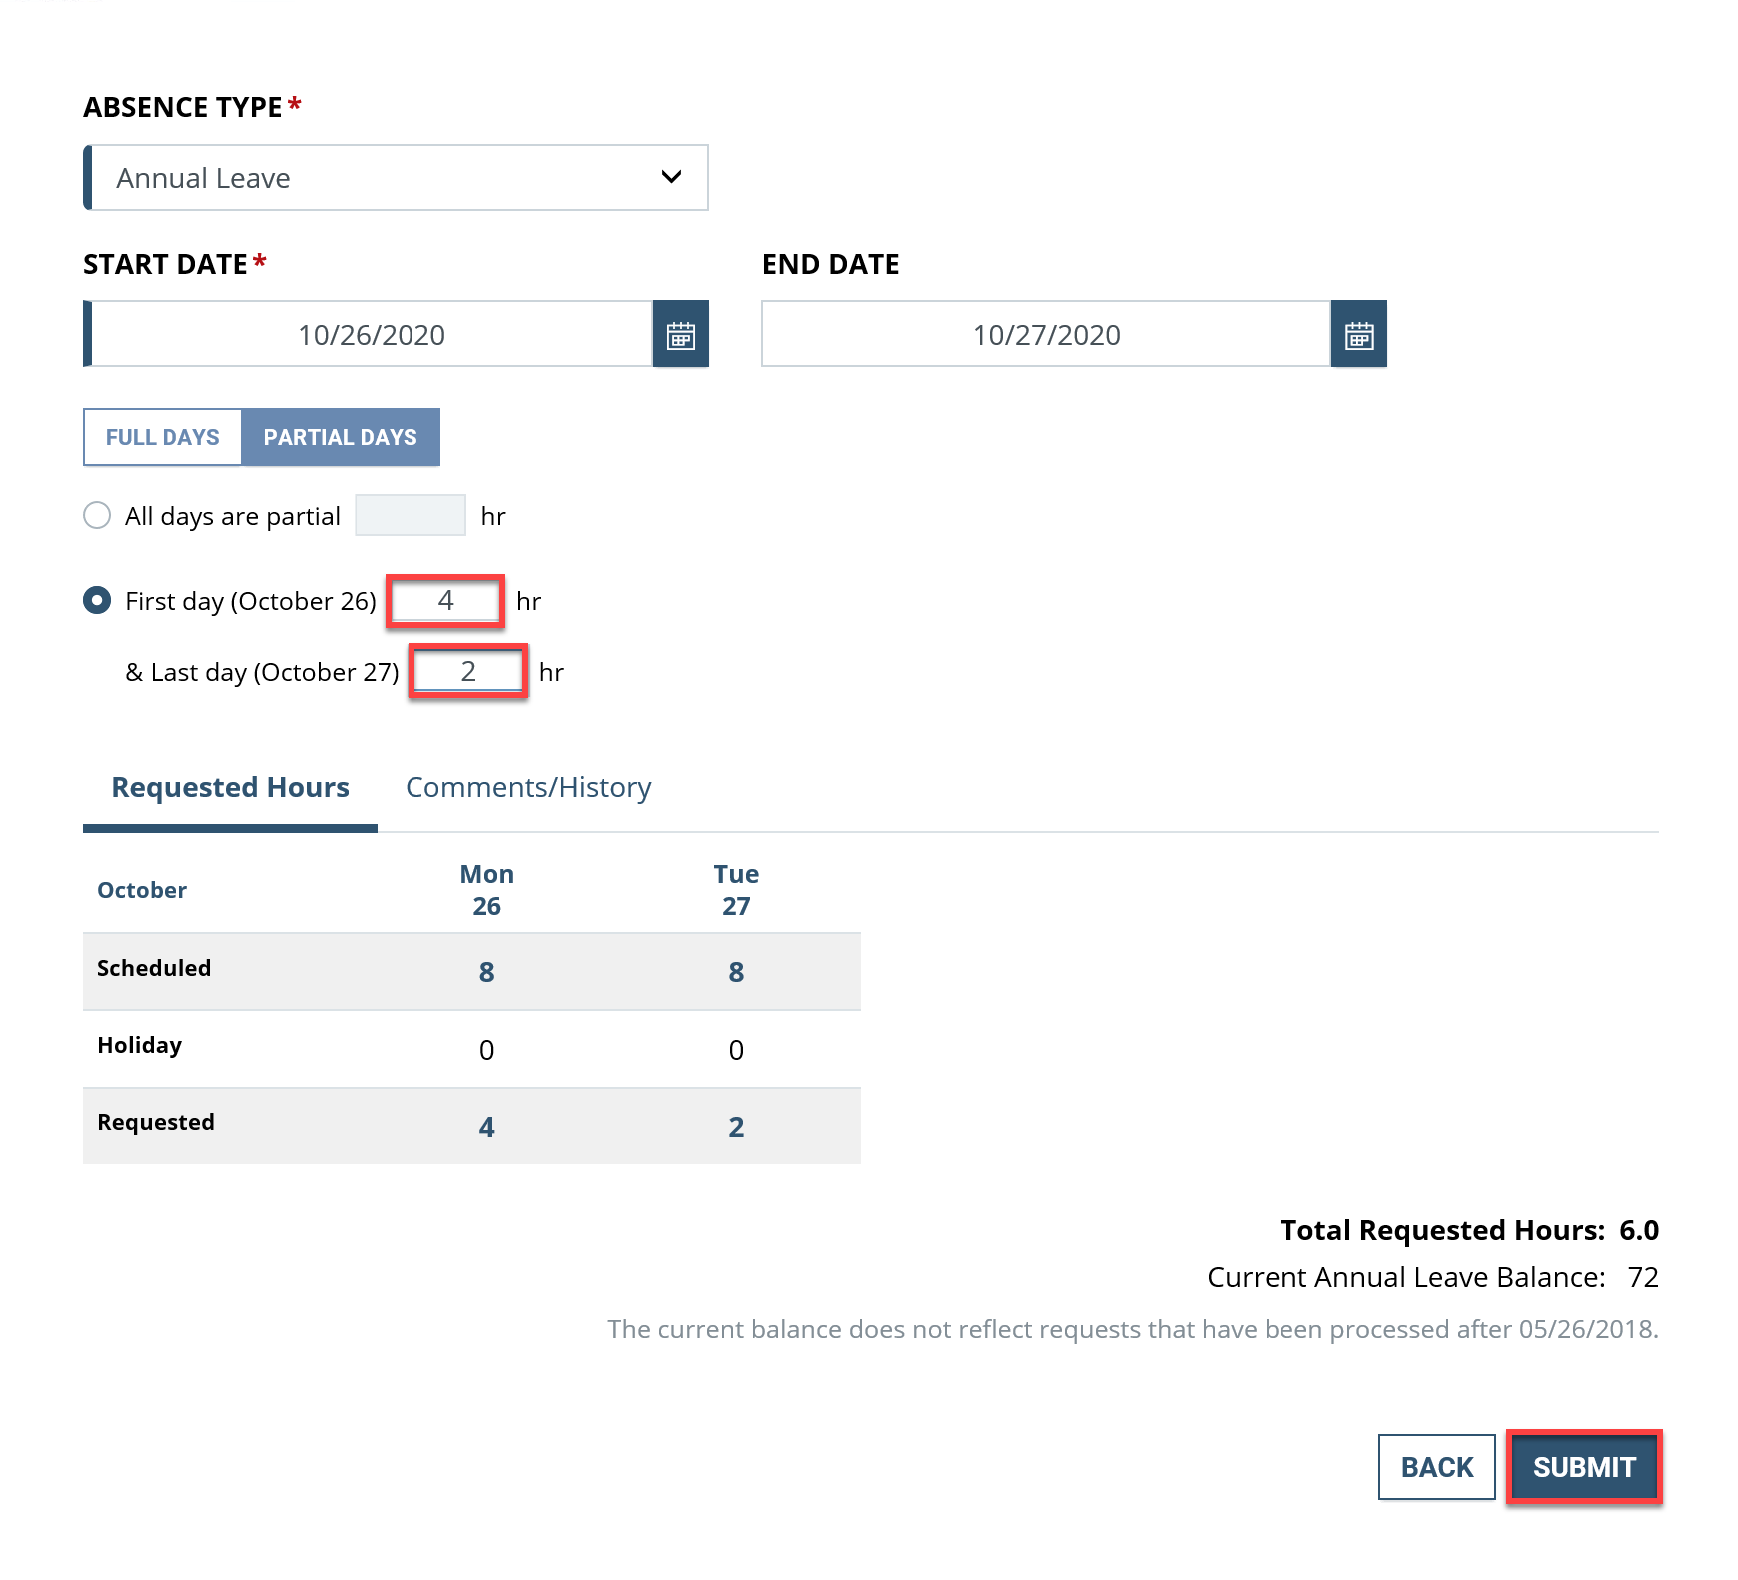
    2. If you are requesting less than full days of absence, select Partial Days. You will have two options:

      • you can select the first radio button: “All days are partial,” and request the same number of hours for all days in the period, or
      • select the second radio button: “First day & Last day”, as shown in the example below, and enter the number of hours of absence you are requesting for the first and last days of the period. The number of hours does not have to be the same for both days, and all other days in the period will be counted as full days of absence. Please note: the value 0 is not allowed for these days.

      As before, select the Comments/History hyperlink to add comments if desired, then select Submit.

      Screenshot of the Absence Type dialog box with first and last days highlighted
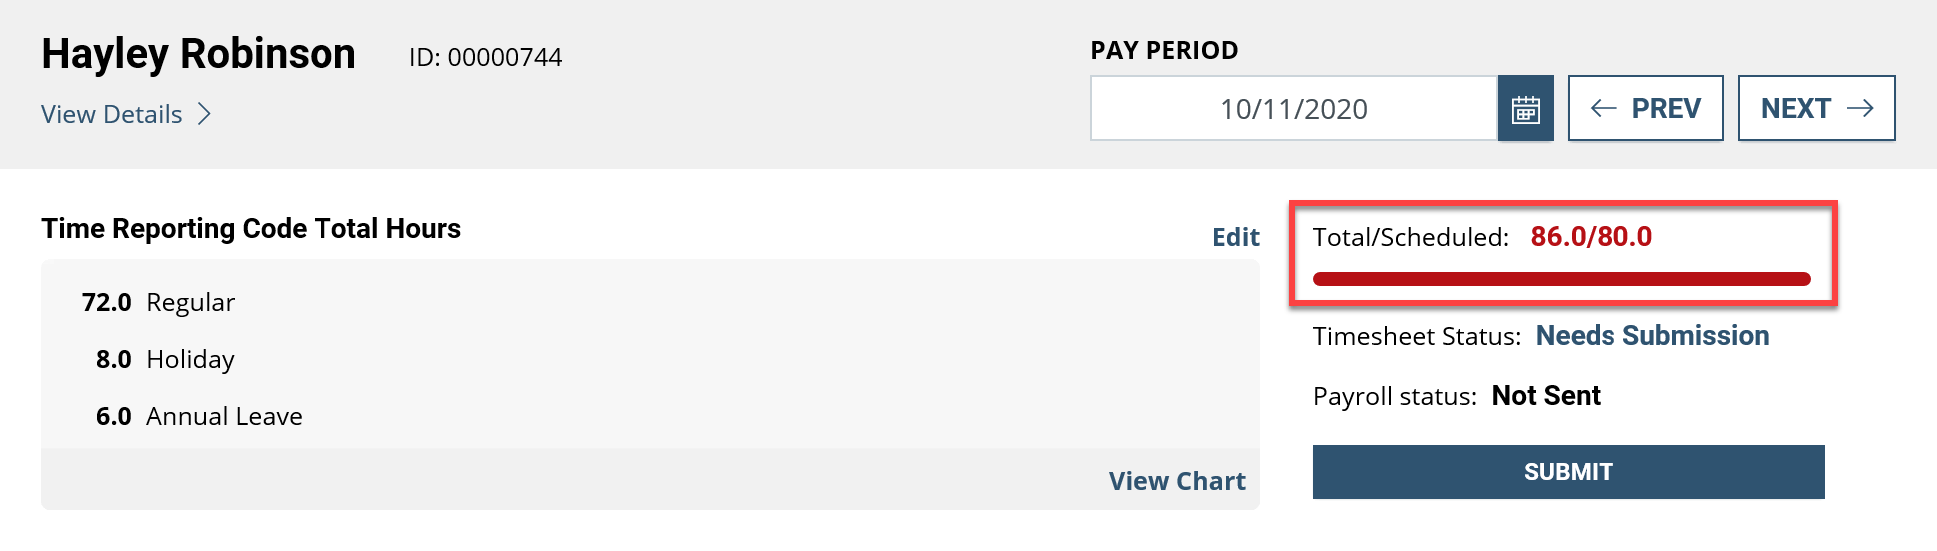
  19. Once you have completed one or more absence requests, you will need to adjust your timesheet so that the total hours you are reporting do not exceed the total scheduled hours for the pay period.

    In this example, adding the leave request has increased total reported hours to 86.0, which exceeds the allowable total of 80.0 scheduled hours. This has triggered a High exception as indicated by the red bar. This exception must be resolved before the timesheet can be submitted and approved.

    Screenshot of the Employee dialog box with Total/schedule red bar highlighted
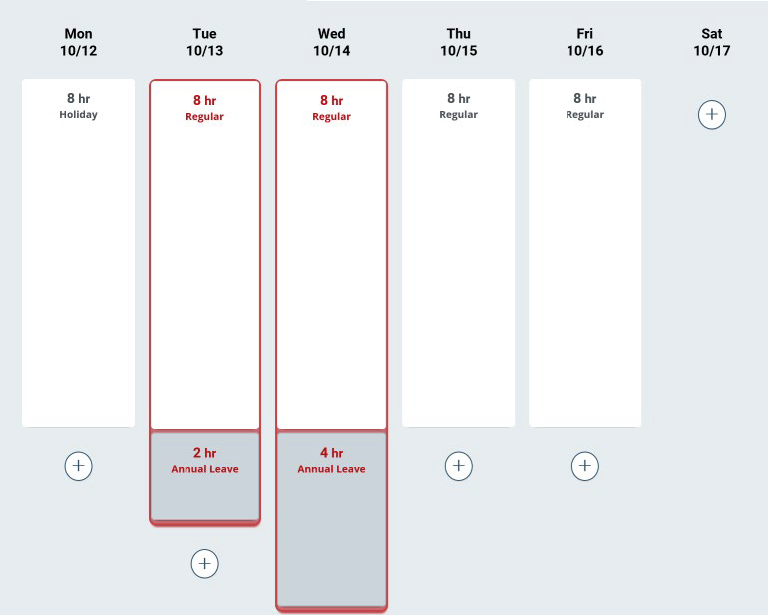
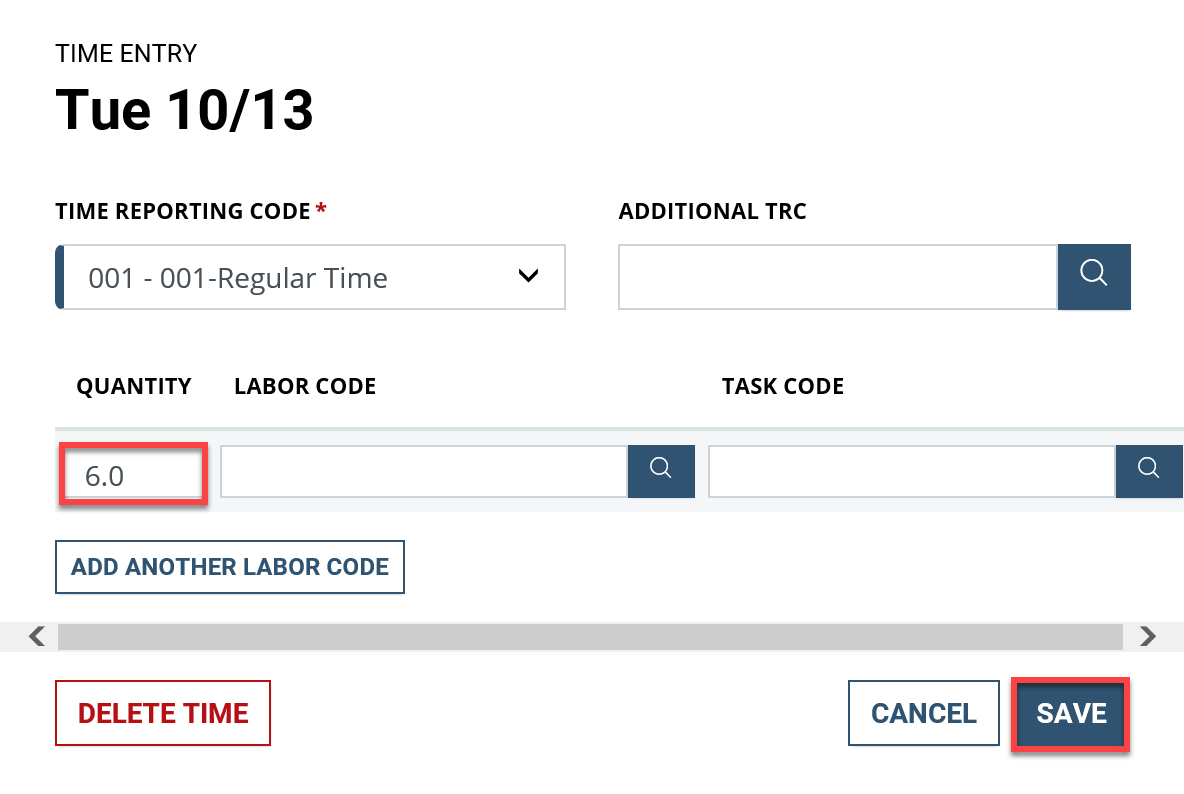
  20. To adjust the hours on your timesheet, select the time block for each day you want to change.

    In this example, the Regular hours for Tuesday, 10/13, must be reduced to offset the 2.0 hours of Annual Leave that were just submitted for that day.

    Screenshot of the timesheet dialog box with multiple days selected
  21. A dialog box will appear; you can make the adjustment by changing the Quantity field to 5.0, then select Save.

    Screenshot of the time entry dialog box with quantity and save highlighted

    Note: The Delete Time button deletes the entire time block — not just the hours in the Quantity field.

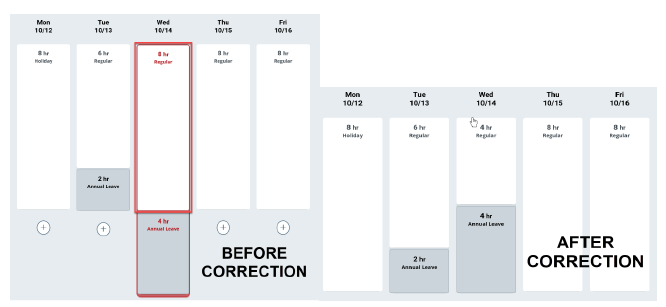
  22. Repeat steps 20 and 21 above to adjust the hours for the other day (10/14) for which Annual Leave was requested.

    Side by side screenshot showing before and after correction
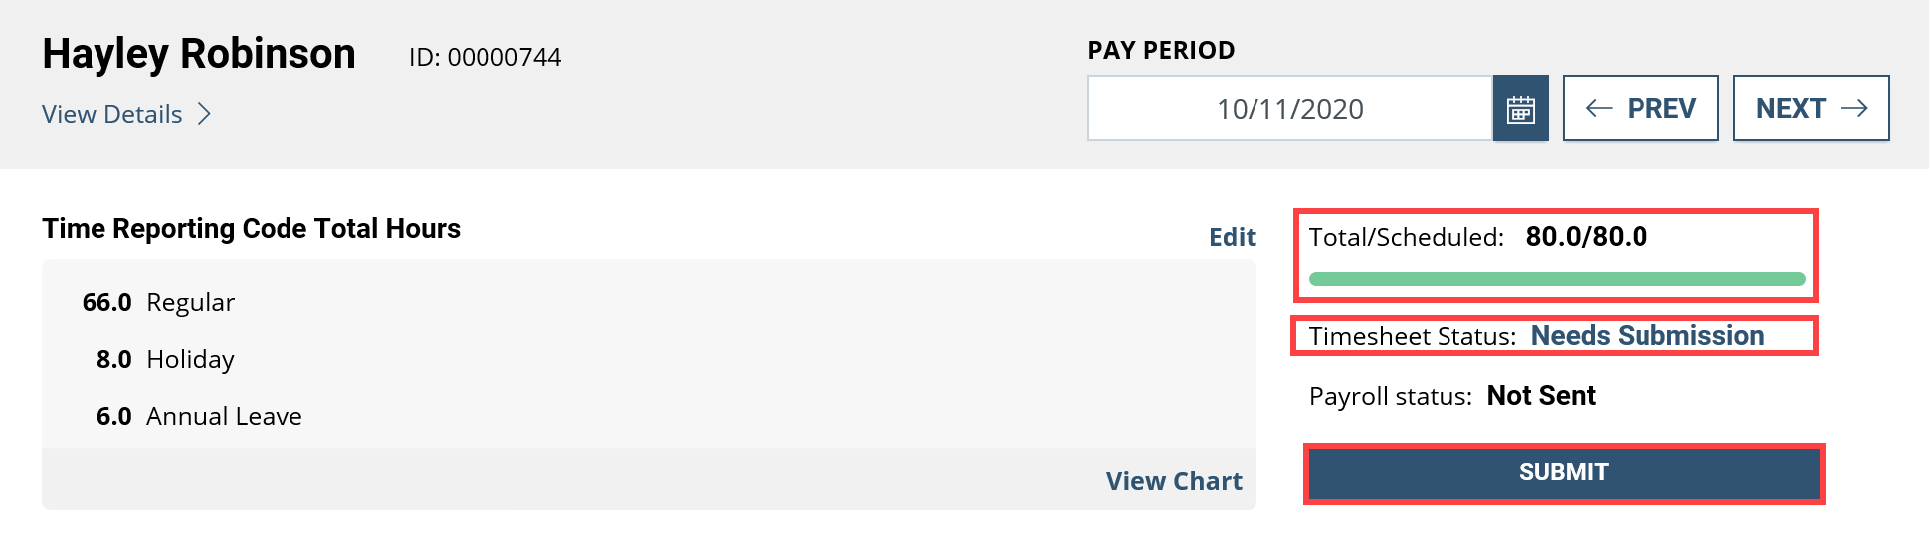
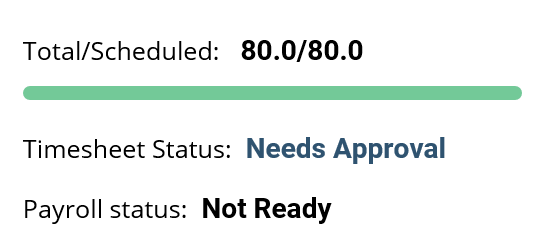
  23. The High exception has been resolved because Total Reported hours now equal Total Scheduled hours, as indicated by the green bar.

    The Timesheet Status is Needs Submission; this will change to Needs Approval once it is submitted. To do this, select Submit.

    Screenshot of the employee page with Total/schedule, Timesheet status, and submit highlighted
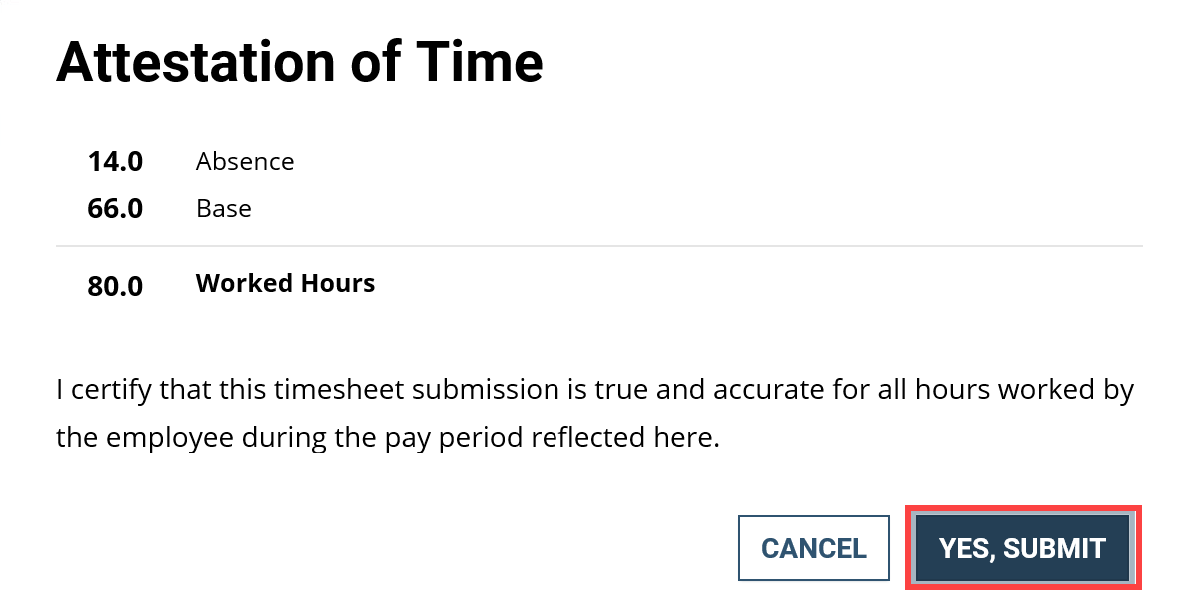
  24. You will be asked to attest to the accuracy of the timesheet you are submitting; after reviewing the summary of reported hours, select Yes, Submit to complete the process (or select Cancel if you believe further changes are needed).

    Screenshot of the Attestation of Time dialog box with Yes, submit button highlighted
  25. You will receive a confirmation message letting you know your timesheet has been submitted successfully.

    Screenshot of the Timesheet Submitted Successfully message
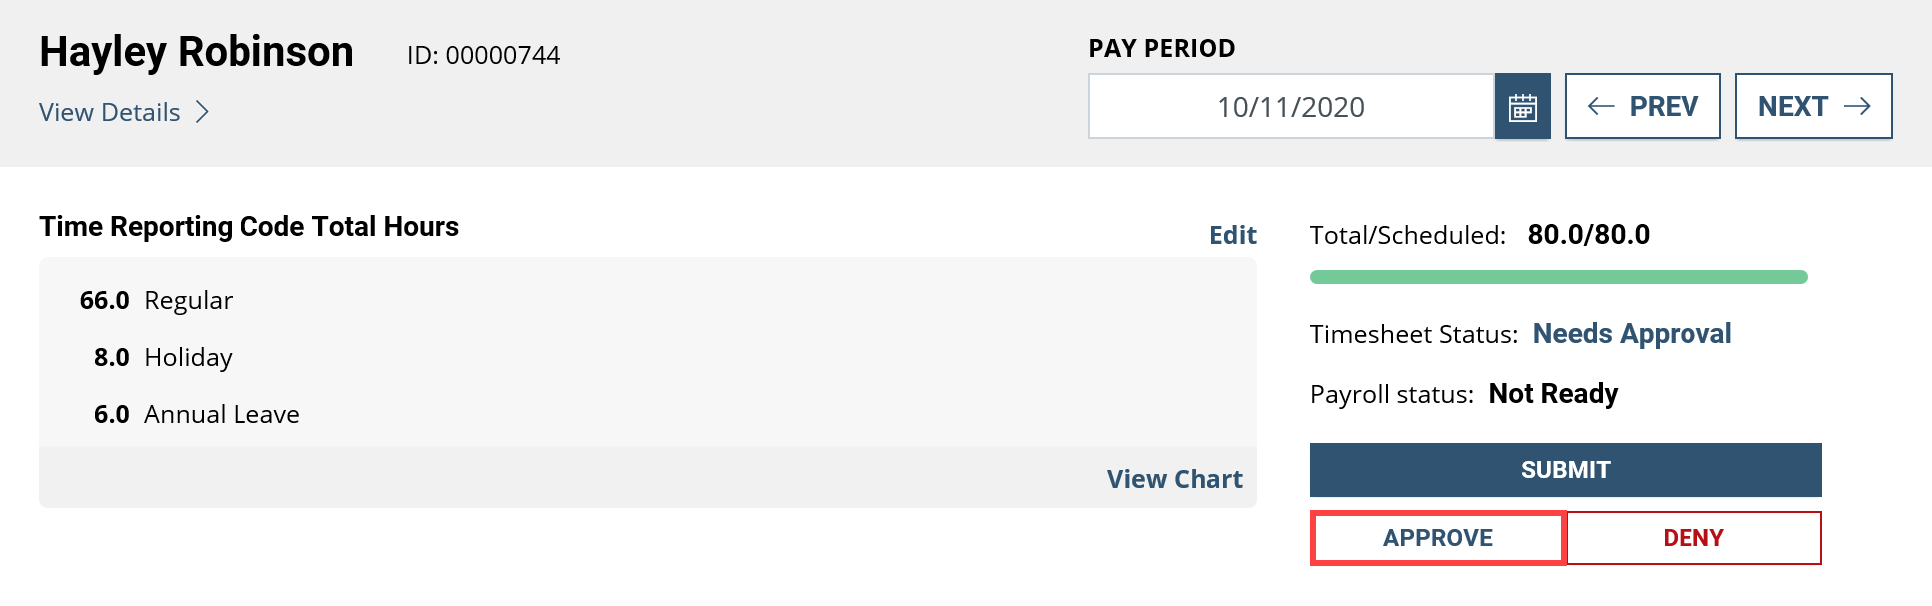
  26. The Timesheet Status is now Needs Approval and is awaiting review and approval by your manager. Once approved, the status will change to Approved and the Payroll Status will also change once the timesheet has been submitted for processing.

    Screenshot of the Timesheet Status showing Needs Approval
  27. Use the Approve and Deny buttons.

    Screenshot of the Approve Submission with Yes, approved button highlighted
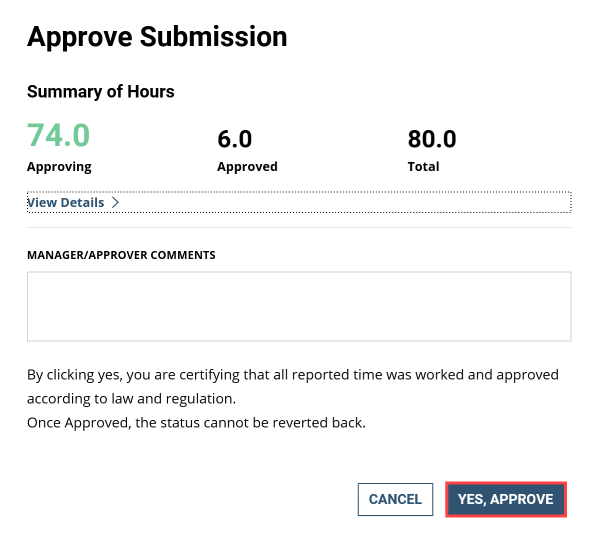
    1. To Approve the Timesheet, click the Approve button. The Approve Submission dialog appears. Enter comments if desired.

      Click the Yes, I Approve button.

      Screenshot of the Approve Submission with Yes, Approve button highlighted
    2. The Timesheet status will change to Approved.

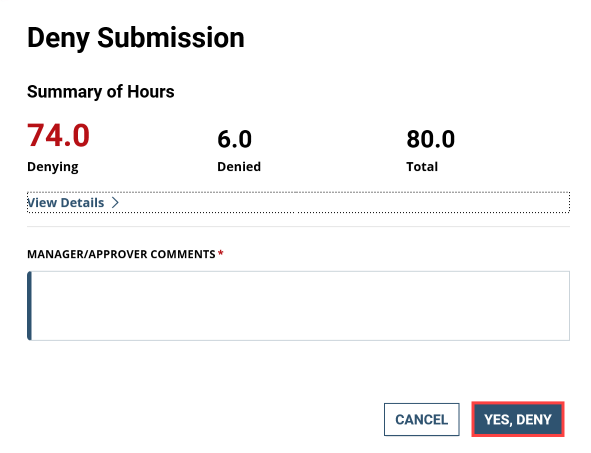
    3. To Deny the Timesheet, click the Deny button. The Deny Submission dialog will appear. Enter Comments, if desired, and Click the Yes, Deny button.

      Screenshot of the Deny Submission with Yes, Deny button highlighted
Print Page Email Page
Last updated: Dec 1, 2025
Top

Home

  • Resources for …
    • Americans with Disabilities
    • Citizens and Consumers
    • Federal Employees
    • GSA Employees
    • Native American affairs
    • Presidential & Congressional Commissions, Boards or Small Agencies
    • Small Business
  • Governmentwide Initiatives
    • Centers of Excellence
    • Digital experience
    • Emergency response
    • Federal Cybersecurity
    • ID, Credentials, and Access Management
    • Information Quality
    • Open Data
    • Technology Modernization Fund
  • Contact Us
  • Organization
    • Leadership Directory
    • Staff Directory
  • References
    • Annual reports
    • Plain Language
    • Budget and Performance
    • Catalogs
    • Orders & Directives
    • Forms
  • Website Information
    • A-Z Index
    • Report a website issue
    • Sitemap
  • Also of Interest
    • Data.gov
    • Whitehouse.gov
  • Tools
    • eBuy
    • eLibrary
    • Contracting forecast tool
    • GSA Advantage
    • GSA Auctions
GSA logo
  • Facebook
  • X
  • LinkedIn
  • YouTube
  • instagram
  • Blog
  • email

JOIN THE CONVERSATION

GSA.gov

An official website of the U.S. General Services Administration

  • Accessibility statement
  • Website Policies
  • Reports
  • Office of the Inspector General
  • No FEAR Act
  • FOIA Requests
  • Board of Contract Appeals
Looking for U.S. government information and services?
Visit USA.gov

PER DIEM LOOK-UP

1 Choose a location

Error, The Per Diem API is not responding. Please try again later.

No results could be found for the location you've entered.

Get my location

OR

OR

Rates for Alaska, Hawaii, and U.S. territories and possessions are set by the Department of Defense.

Rates for foreign countries are set by the Department of State.

2 Choose a date


OR

Rates are available between 10/1/2023 and 09/30/2026.

The End Date of your trip can not occur before the Start Date.


Additional terms and conditions

Traveler reimbursement is based on the location of the work activities and not the accommodations, unless lodging is not available at the work activity, then the agency may authorize the rate where lodging is obtained.

Unless otherwise specified, the per diem locality is defined as "all locations within, or entirely surrounded by, the corporate limits of the key city, including independent entities located within those boundaries."

Per diem localities with county definitions shall include"all locations within, or entirely surrounded by, the corporate limits of the key city as well as the boundaries of the listed counties, including independent entities located within the boundaries of the key city and the listed counties (unless otherwise listed separately)."

When a military installation or Government - related facility(whether or not specifically named) is located partially within more than one city or county boundary, the applicable per diem rate for the entire installation or facility is the higher of the rates which apply to the cities and / or counties, even though part(s) of such activities may be located outside the defined per diem locality.